The Azure VM Discovery Event Monitor detects and auto-onboards new devices into your monitoring configuration. This tutorial will teach you how to set one up and configure its settings.
To begin, select the authentication you'll use to connect and the device group that discovered devices will be added to.
 Azure Connection Settings
Choose the device naming scheme that the event monitor will use to onboard new devices. You can use the internal IP address, the external IP address, or the external DNS.
 Name Settings
The "Display Name" option controls how the event monitor will select display names for the devices that are detected. With "Use the device name" the display name will be the device's IP address or host name if reverse DNS is used. With "Use instance name" the event monitor will retrieve instance name and add use that has the display name. If instance name is not available then it will fall back on the IP or host name.
 Display Name Settings
Set the level of alert you want to receive if the event monitor cannot contact Azure. Below this, choose the level of alert you want to receive if a previously discovered device isn't detected.
 Alerting Settings
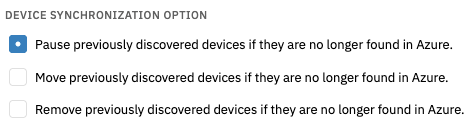
Next are some device synchronization options. These govern what happens to previously discovered devices when the event monitor detects them on a consecutive run. You can choose to pause, move, or remove previously discovered devices.
 Device Sync Options
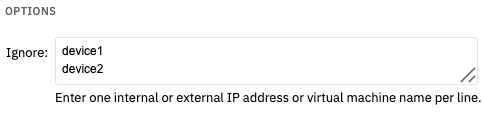
Finally, enter devices you want to ignore in the "Ignore" text box. Enter one internal or external IP address or virtual machine name per line.
 Ignore Settings
This tutorial taught you how to set up an Azure VM Discovery Event Monitor to begin automatically onboarding new network devices. See our Features section for more tutorials, including ones for other discovery event monitors. For more documentation on this event monitor, check out its Technical Resources article.
More IT Monitoring Features